Tuesday, April 29, 2014

The Wonderland Bag that Wasn't.

Sigh.

A couple of weeks ago I read through the directions for the Wonderland Bag from the book Big City Bags by Sara Lawson.
Wonderland Bag as pictured in Big City Bags by Sara Lawson.
Every month Angela from Sewing with Squeak host a linky party for a bag from the book. The Wonderland Bag is number 4.

From the beginning, I have struggled with the bags. My biggest struggle is just getting all the pieces cut out. There always seem to be soooo many. I don't know why I hate it so much. I have to constantly remind myself that I will not be defeated by this first step!

But even with that success, it is becoming pretty clear that I am not a great bag maker.
January's Bag.
For January's bag, I had left over pieces and my lining was saggy and much too large for the bag. Also, there was so much bulk in my seams that my machine had some troubles at the corners. But, in the end it turned out okay.

Month two I missed the deadline but did finish February's bag the first week of March.
Like this bag a lot.
This one went pretty quick for me and I am still carrying it for spring but I made a couple mistakes that mean the bag probably won't last me very long. Partially it was the fabric I chose, partially it was lack of experience with bag making.

{Memo: Bag Making is a skill that requires Yoda like patience, knowledge of all kinds of bag construction techniques, bag making tricks (that make the bag look professional) and even more knowledge about bag hardware; where and what to buy. And while I have books and the internet, much like all other sewing; to get really good at it takes time at the machine.}

In March we made a cute clutch purse.

Daughter took this one to prom.
This one went pretty well and left me excited for April's assignment. Not really any major mistakes or issues except with the zipper and the way the bag curved. Again, experience.

Then today and April's bag. One would think I would be getting better at bags now that we are on month 4. And when I read the directions in the middle of the month, I imagined this bag would go pretty quick. There weren't a tremendous amount of pieces to cut (yay!!) and the design is very straight forward but, as soon as the main fabric pieces were cut, I knew I was in trouble. The size of my panels, cut according to the directions, did not even come close to matching what I thought I saw in the book as far as size. I based that on a photo where Sara is holding the bag. There was no way my bag was going to turn out that size. The only way it would even come close was if I turned my fabric to make the larger measurement the width but my lining was directional and had already been cut and even if I turned it, it still seemed much smaller than the bag in the picture appeared.

I sat thinking things over and looking at the pictures of the Wonderland Bag. Truthfully, even if I tried again, cut more fabric and made the bag, it wasn't my style. I am short and big bags make me look shorter. What would I do with it? Did I really want to make the bag? The answer: No. If I am going to spend time, effort and money on a bag I should like it. Even if I were to give it away afterwards, I still should like something about it. It is not a bad bag, it is just not me and the thought of the effort to start over and try to figure out some workable measurements just didn't seem worth it.

But, now what? No Big City Bag for April and what to do with the cut fabric. It seemed about the right size for a toiletry case or a large zippered pouch. The fabric would work for a guy so why not make a case for my son? I used my favorite tutorial for a large cosmetic bag and ta-da....one zippered pouch for Cole.
Found a guitar applique online. Cute.

Used my machine blanket stitch which made it quick.

Had some fusible vinyl which I used to make the inside waterproof.

Cole was quite pleased with his bag and I got some experience with machine applique. I am going to link up with the linky party but my "Wonderland Bag that wasn't" shouldn't be included in the prize drawing. After all, it's the bag that wasn't and it's okay.

Monday, April 28, 2014

Second Verse, Same as the First! The Monthly Stitch April Challenge - Sewing Double.


Hello Monthly Stitchers

So happy to be here and a part of your monthly challenges. This is my first post ever at the Monthly Stitch and am so excited I was able to get my Sewing Double garment completed before the end of the month. I joined the facebook group first and have been trying to work my way through Wordpress to get things going. 

There sure is a lot of inspiration on the fb page.  Yesterday, I spent some time visiting many of your blogs. So impressive, all the sewing skill out there! I have a lot of catching up to do.

Last month I sewed up this linen blouse. This blouse is super special because the linen fabric was given to me by my Mom many years ago. Often I have thought about using it for a pillow or curtains or some type of home dec project because it is a mid to heavier weight linen. So glad I never did, because it made a cute blouse that is super comfortable

Polka Dots. Love.
The pattern was a resale shop find. 
Blue dot means it was 50 cents. Score!
I think the pattern may be out of print now, I don’t know. How does one tell how old a pattern is aside from the picture? Do they have dates on them somewhere? 

Anyway, this blouse was my first Simplicity Pattern. I have always kind of been afraid of Simplicity Patterns. I guess I thought they were harder somehow than the other big pattern company patterns. Well not this one, the directions were very clear, and it had simple steps and lots of options for different styles of blouses. I just love it and will be making the V neck version for sure later this summer.

So…today I made my double from some quilting cotton in my stash. 

Fabric is quilting cotton from Dear Stella.
The second time around the blouse got even easier and everything went quick, which is the point, right?? This time I took extra care with each step and made the inside look all purrrrrty.

One thing I will probably change when I make it again is to remove the ease from the sleeve cap. I was poking around on the internet the other day and saw a tutorial for that. But, I would love suggestions from any of you as well as to what is the best way to remove that ease.

Now, off to dig through my knits for next months challenge.


Tuesday, April 22, 2014

April GAM is early!

Butterick B5642. Lovely pattern that sews up quickly and beautifully.
I'm pretty sure this is the first time my Garment of the Month has been early. Not just a little early either but over 2 weeks early!

This dress was finished last Wednesday the 16th, and all ready for Easter Sunday. The pattern is Butterick 5642. I absolutely love the pattern and the dress.

There are two pretty big deals about the making of this dress. One, this is the first dress I have ever made for myself! I realized that halfway through sewing it up. (oh, I just remembered I made 2 knit dresess back in October and November when I first started the GAM so this is dress number 3). One of them I have since donated due to poor fit. I usually only make skirts and blouses, never dresses for myself. I think the reason is I am short so always, always, always, bodices on dresses are too long for me and gap in the back especially at the neckline and are a general pain.

BUT, this time and here's number 2 big deal; I changed the way I view making a muslin. I use to think sewing a wearable muslin was better because....well, I don't know why I thought that. It just seemed like the thing to do. I don't like throwing things away so perhaps that was the reason but who knows. I just got into the habit. Well, I am not going to do that anymore and didn't do it this time. Really when I was making a wearable muslin I was making the garment as perfectly as possible but I don't think that should be the purpose of the muslin. It is for pattern making and fine tuning and fitting. Am I the only person on the planet who did not realize this?  Sometimes those habits, just can't shake them.

But for this dress the muslin was sewn in less than a hour complete with the zip. Another hour later I had a workable pattern that fit me pretty much as well as possible for where my sewing skill is currently. I still would like to do a shoulder seam adjustment and bring the whole bodice up a tad but overall am very happy with how the dress turned out.

Definitely will be making this dress again. Maybe sleeveless next time with a cotton voile and fully lined??
The fabric is 100% linen so I did not bother lining it although it is called for in the pattern. If you have never taken the leap in to linen for garments, I highly recommend it. So easy to sew and work with.

I also added some neckline details using a decorative stitch on my machine and some hand stitching. My daughter didn't care for the hand stitching up the neckline but I love it. The sleeves and hem were finished with a rolled hem on the serger. Love the way the rolled hem looks on the flutter sleeves curling a bit and making them even more feminine.

Neckline details. Inset with decorative stitching.
The dress had lots of gathers, back darts and an invisible zip.

Why are there so many more wrinkles in a picture!!
I can think of lots of style ideas such as an exposed zip, many different neckline details, beads, trims, more elaborate embroidery. Also, would be lovely in black linen as well with some beaded trims.

Excited that I finished my April GAM and if you want to see some great seamtresses and their beautiful garments head over to GAM and take a peek. So fun.

Tuesday, April 15, 2014

Craft Book SAL - April project.

Lots of sewing stuff lately. Life has slowed down some, so sewing has resumed! Yay!

For almost a year now I have been promising my son some things: new curtains, some shirts, a duffel bag and a garment bag. Because I needed a good quick project for the April Craft Book SAL hosted by http://craftytwinmommy.blogspot.com/ and due to a good case of the guilts as I was sewing yet something else for myself AND because my son had an upcoming trip, the time was right for his garment bag!

Bag has cute piping all around. Hard to see in photo.
I purchased  this really cool guitar fabric last summer from an online shop. Can't remember where now but I just googled guitar fabric and stuff came up. He is a musician and the idea was to sew him up a gig bag, a garment bag and perhaps a guitar strap for his birthday last June. I am a little late getting started but his garment bag got done. :)

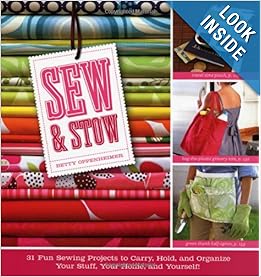
The pattern used was from this book:
Book is....ok.
Sew and Stow gets mixed reviews online. Although I think the Author does a decent job of outlining directions it is not entirely beginner friendly. Yes, there are are some simple patterns but sometimes one has to know something about sewing to figure out the directions. I have made a few things from the book and like her overall design for the garment bag BUT hers is not lined and I think it is a tad too small for menswear. Having said that, I was pretty happy with the outcome and just figured out how to line it myself. It wasn't too hard.

Used a poly satin for the lining.
My son is pretty happy with his bag and has used it a couple of times already.

He's happy; I have an entry for my SAL; One of the projects on my list was completed; Stash fabric was used; AND the dust was blown off a craft book I've had for a while. Now I call that success!

Sunday, March 30, 2014

Lovely Little Linen n' Lace


Claiming her Meringue clutch.
Things have been happening here. And they don't have anything to do with sewing; which makes me a crumpy person. There have been Debate tournaments, music recitals, road trips to do college things, car repairs, work (necessary, I suppose) and general life event things that require attendance (this one is ok). NOT MUCH SEWING.

But, finally, this past week I had 6 days off in a row. Whoohoo!!! Let's sew!!!

I thought anyway, but amazingly very little has been accomplished. Almost an entire day was spent trying to figure out how to make a mini sawtooth star quilt pattern when what I should have done first thing was google it. Because, guess what?? Someone has ALREADY come up with that pattern. Of coarse they have. Quilting is a mature industry for sure and there aren't too many surprises out there. Yes, new variations on patterns, yes, the trend of "modern quilting", yes, occasionally new techniques, and yes, lots and lots of new fabrics always.

Sawtooth Star Quilt Block
The beautiful Sawtooth Star Pattern.
But you can be assured when it comes to something like the sawtooth which is an OLD quilt pattern, well, pretty much every aspect of that pattern has been thought about and given the once over by someone! No need to reinvent the wheel. So, memo to self...don't waste time and fabric trying to come up with a pattern for a certain size block because someone already has (or come close anyways).

Another day was spent on the Gabriola skirt SAL from Sewaholic. Because the pattern requires 5 yards (yes, it's true, 5) of fabric, I made a muslin from a .49 resale fabric. Thank goodness, I did. My muslin had/has some issues. What should have been a quick sew of a great maxi is now lingering in my sewing room. Meanwhile...tick, tick, March is coming to a close and my Big City Bag for March was not done!

It is a good thing this month's bag was an easy one! The Meringue Clutch.

From: Mommy's Naptime as featured in Sara's book.

Yes, even in my sewing slump, I was able to finish the Meringue Clutch! I have learned quite a bit about bag making in the last couple of months. Between Sewing with Squeak's Big City Bag SAL and Deby's Carry All Bag, the opportunity to work with various interfacings, bag hardware, and bag making techniques has been ample.

This Clutch design just speaks summer to me so I wanted something soft and summery. Linen and Lace! I used pure white linen and a vintage piece of cotton lace I've had since my 20's. Trust me, it's vintage. :) I opted to use a medium weight interfacing and skipped the interfacing all together for the strap. Also, after seeing a few comments about the gathered panel that was used I decided to only cut my to 20" instead of 24". I did not want the lace pattern to be lost in the gathers. I also didn't topstitch near the zipper. Call me a rebel.

Really like the shape and size of this clutch.

Cotton lace which my Mom gave me eons ago.

So pure and white, it is my opinion that linen is one of the most beautiful fabrics available.
 Anyway, I am quite pleased with how the bag turned out. One of the great things about Sara's bag patterns is they finish to very generous sizes, even this clutch. My daughter promptly claimed the clutch. Happier now.

Craft Book March finish!

I missed the Craft Book SAL in February. I actually had a project done! It was a Bear Paw quiltlet, super cute.

I had spent many hours at a Debate tournament hand sewing the pieces and then quilted it on a road trip to look at colleges in VA. While staying at this B&B  in VA. we ate breakfast with a lovely young couple. Treva informed me how much she loved quilts and how she so wanted to learn how to quilt so...I gave her the Bear Paw. Sadly, in my excitement of giving the quiltlet to her, I did not get a picture so thus no project to show for February. Oh well. You'll have to trust me, it was sorta cute!

So in my eagerness not to miss March AND my longing for spring, I was eager to get this month's project done. This bag was actually finished the first week of March.

A simple bag in nice spring color of yellow and light blue.

My lovely assistant!

This was a fairly easy sew. The Go-Go bag finished generous in size and the pattern is from this book by Sara Lawson:
Image from Amazon.
I used a nice canvas weight yellow toile for my main fabric and a light blue wool for the lining. It actually turned out to be a bit too much stuff and some of my seams were difficult due to bulk. I do so love sewing with wool though, I would do it again just probably not with fusible fleece AND Soft and Stable. I stole the hardware off an old Tommy H. bag. I actually learned a bit about bag construction when I took the Tommy bag apart.

My favorite part of the bag, the back. I fussy cut the fabric.

Inside peek.
The directions said sew the accent piece on and then work with the lining but I wanted the sewn pattern shape to show on the inside of the bag so I did them together.

Poor machine, really got a work out on this one.


Tuesday, February 11, 2014

Rockin' Along with Goodnight Irene


February is just flying by. Between prepping for College visits, attending long weekend  Debate tournaments and work it seems like the first of the year just rolled around yesterday. However, I KNOW that is not true, well....because the calendar says it is February 11th! I am sooo happy that on the very first weekend of this month I sat down at my machine and finished my February assignment for the Goodnight Irene SAL. And, just today did I have sunshine, a day off and time to take pictures of my progress!!

TaDaaaa.......!!
My Goodnight Irene will be twin(ish) sized so to be on track I needed to have 6 complete rows done by the end of the month. Yay, did that! I am sewing my blocks and rows together as I go along due to a BIG BIG fear that this quilt will not be completed in a timely manner (if at all), if I don't do so. I am okay if two identical 2 1/2" squares end up close together or heck even side by side! Equally okay if two of those small triangles end up lovin' each other. It does go against something in my nature but, I have decided to just let it go. :) My hope is to be all done by the time my son's wedding in May comes along.

By the way, are you loving this pattern as much as I am? It is so simple yet produces such lovely results. I have been visiting other's blogs and looking at their progress and every single one of their quilts is so lovely and beautiful. So impressed with all the talented quilters and sewers out there.

Just love this pattern. Am so happy I decided to SAL!